
Folk Art Walking Sticks
Introduction: This lesson won a "Model Curriculum" award from New York University's Folk Art & Folklife in Education Summer Institute in 1997. It focuses on building critical thinking skills, folk art and artists and creatively using unique media.
Submitted by Michael Gettings of Swift Creek Elementary, Chesterfield COunty Public Schools, Chesterfield Virginia
Lesson Activity:
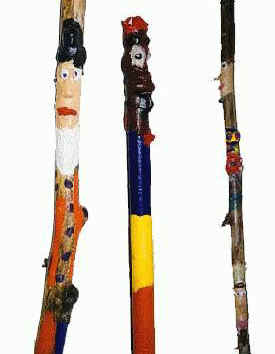
Day 1: Students are shown pictures of carved Folk Art Walking Sticks. They are told nothing about the art works or the artists; their job is to discover all they can about the art works. Working in teams, they are asked the following five questions; writing the answers on a worksheet.
- What do you see? Just a simple description; "It is a stick with a person on the top and it.."
- How did the artist put it together? Is it carved? What design elements or principles were used?
- What do you think the artist is trying to say? This is purely speculation for the students; they have no information about the artists at this point.
- What do you think of the work and why? "I like it because.."
- What is folk art?
This "discovery" process and closure lasts one 45 minute class period. As closure, the students share answers and speculate about when the sticks were made, etc. They are told about the artists and art works. Students must bring a clean, bark free stick to the next class. The stick must be found, not cut, must not be taller than their shoulder and must not be too skinny or too fat.
Day 2: Students should make a figurative feature on their stick. This is done by choosing an area that suggests a figure (man, animal or combination) and enhancing its appearance with Paperclay® modeling material. They take a pinch of the Paperclay, press it onto the stick, peel it off, moisten the part that will press against the stick and attach the Paperclay. Students must rub the edges of the Paperclay onto the stick until a smooth seam is produced (no cracks!). The Paperclay will adhere very well to clean sticks. If any piece falls off, simply glue it back on with white school glue. While the Paperclay is still moist, they can use a variety of handbuilding techniques to sculpt the figure. It works very well!
Day 3-5: I see each student once a week, so the next time they come to see me the Creative Paperclay® is dry and can be painted. The students paint the entire stick. Tempera paint works fine. The sticks are coated with Mod Podge for the nontoxic varnish look. Be sure to have a piece of Masking tape on each stick with the students name on it.
Conclusions: This lesson can be as deep or shallow as you wish. Students can do independent research on walking sticks from other areas and cultures. They can also research the history and background of paperclay. Using or introducing Folk Art to the students broadens the knowledge and understanding of art, artists, and the their culture. The end product is a stunning piece of work. The use of Paperclay® enhances features and gives the work a hand carved appearance. Parents, students, and other teachers all rave over the student sticks.