
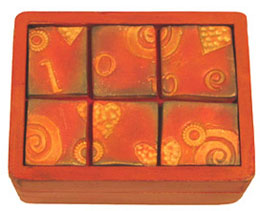
Love Box
Designed by Sara Felix of Austin, Tx.Materials:
- Pencil
- Cardstock
- Scissors
- Ruler
- Wood craft box
- Creative Paperclay® modeling material
- Letter stamps
- Spiral Stamp
- Heart Stamp
- Round Beads
- Colorbox Cat’s Eye Pigment ink pads: Scarlet, Amber and Turquoise
- Soft Paintbrush
- Moonglow pigment powder, 49er Fool’s Gold
- Acrylic Paint, Black, Salmon and Gold
- Acrylic Spray Sealer
- E6000 Adhesive
Procedure:
1. Measure the top of the box where the tiles will sit. Make a template out of cardstock.
2. Paint the box black with acrylic paint then let dry. Paint the box with red, let dry. Sand the edges to expose some of the black paint for an aged look. Finally, paint the box with gold, lightly so the other colors show through.
3. Roll out a piece of Creative Paperclay® about a quarter of an inch thick. Lay the cardstock template on the rolled out piece and cut around the template.
4. When stamping the clay first stamp out the letters of the words you are using, in this case, love. Press the other stamps into the clay around the words.
5. Lay the template back onto the clay and cut off any clay that can be seen around the template.
6. Cut the clay into tiles. For a small rectangular box the final number of tiles is three tiles horizontally and two tiles vertically, 6 tiles altogether. Let clay dry.
7. Paint the tiles gold. Let dry. On the raised surface of the tiles brush the tiles with scarlet pigment ink. With a soft paintbrush dust the tiles with the Moonglow pigment powder.
8. Brush the tiles with amber pigment ink and dust again with the Moonglow pigment powder. Lightly brush the edges of the tile with the Turquoise ink pad.
9. Seal the tiles with an acrylic spray sealer. Do not use a brush-on sealer, it will remove the color of the pigment inks. Also seal the box at the same time.
10. Glue the tiles to the top of the box with E6000 Adhesive.