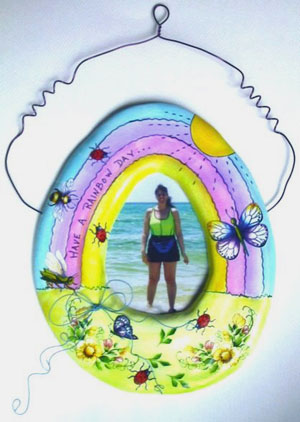
Have a Rainbow Day Picture Frame
Designer - Dimples - Marshfield, VTMaterials:
- 8 ounces Creative Paperclay® modeling material
- Deco Art Americana Acrylic Paints: Snow White, Lemon Yellow, Summer Lilac,
Salem Blue, Baby Pink, Yellow Green- Deco Art Pearlizing Medium
- Royal Rub on Bugs, #FIT-220
- 5 ¾” x 7” of CPE Stiffened Eazy Felt
- Artistic Wire: #S07 Orchid,18” of 18 gauge; #04 Powder Blue, 2” and two 12”
pieces of 24 gauge- Paintbrushes: #10 shader
- 5 ¾” x 7” of copy paper
- 3 ½” x 4 ½” Keep A Memory ACID-FREE Laminate
- Black Identi-Pen
- Beacon Adhesives Kids Choice Glue
- Plastic Wrap or waxed paper
- Rolling pin
- Plastic knife
- Fine sandpaper
- Paper towel
- Pencil
- Scissors
- Non-stick baking sheet
- Oven- preheated to 250 degrees
Procedure:
1. Fold paper in half side to side, cut out frame as illustrated. Cut window in center 1 ¾” from outer edge. Open pattern. If additional trimming is required, refold pattern and trim as desired.
2.Transfer pattern, cut one from white felt. Set aside.
3. Line smooth clean work surface with waxed paper. Roll the Creative Paperclay® evenly till approximately 1/2” thick. Center pattern on clay. Cut around edges with plastic knife. Remove pattern and scraps.
4. Smooth and round edges of frame with fingers. Use end of wire to poke holes for handle on opposite sides and for bow on front frame.
5. Bake frame on non-stick baking sheet in preheated 250 degrees oven till dry. Approximately 45 minutes. When dry, remove from oven and let cool. If necessary, sand edges smooth. Wipe off dust with paper towel.
6. Paint front and side edges of frame Snow White. Let dry. Refer to photo for position and placement. With pencil, freehand stripes and half circle sun on frame. Mix Pearlizing Medium with acrylic paint 2:1. Paint bottom, stripes and sun as pictured. When dry, draw details with black marker.
7. Position and rub transfers in place as pictured following manufacturer’s instructions. Spray with acrylic sealer.
8. Bend Orchid wire in half forming loop in center. Wrap ends in coil around brush handle. Set aside. Form two shoestring bows with Powder Blue wire making one ½” larger than the other. Curl ends of wire. Center small on top of large bow. Wrap 2” wire around center of bows twisting ends together on back side. Trim ends to ¼” long.
9. Glue handle and bows in place. Glue felt on back leaving one side open. Cover photo with laminate following manufacture’s instruction. Insert photo in frame.