Three Swimming Fish
by Shirley Rufener, CPD
Shirley's website: www.shirleyrufener.com
Materials:
- Delight™ air dry modeling compound
- 3 STYROFOAM™ hen eggs (and a Styrofoam scrap)
- 12" x 4" piece of 1" thick STYROFOAM™ sheet
- Acrylic roller tool or smooth drinking glass
- Kitchen plastic wrap or waxed paper
- 2 feel of 1/4" thick wood dowel and heavy kitchen utility scissors or small saw
- Acrylic paints: black, off white, lime green, red, yellow, aqua green and lavender-blue
- 4 round toothpicks
- White tacky glue
- 5" long piece of 18 gauge wire (use as a spiral texture tool)
- Needle nose pliers
- Fat marker with a lid (lid used as texture on fish)
- Flat paintbrushes (1/2" and 1/4" wide)
- Paper towels
- Clear satin sealer spray (for acrylic paint)
Is there a spot in your home that just needs a little "splash" of color? Then why not make this whimsical fish accent with Delight modeling compound. The fish bodies are formed over regular STYROFOAM eggs, and the water base is cut from 1" sheet of STYROFOAM. This is an intermediate project but it's not hard at all to create. So get out your favorite paint colors and start covering those shapes.
Instructions:
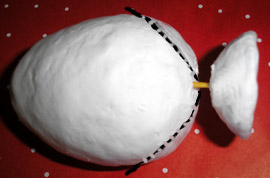
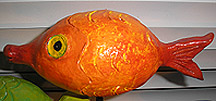
1. Roll out a large sheet of Delight to 1/8" thick on plastic wrap and cover ONE egg. Smooth any bumps with finger. Form a half circle with Delight. Break a toothpick in half, dip one piece into tacky glue and press it halfway into the fat end of the egg. Apply glue to the to the end of the toothpick that is showing and press the round side of the clay half circle onto toothpick to secure it to the body for the tail. Add scales to the fish's body with the marker pen lid holding it at an angle to form half circles. Press the bottom end of the marker into the eye areas on fish.
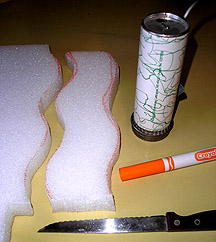
2. Sand and taper the fat end of the remaining 2 eggs as shown, using the flat side edge of a scrap of STYROFOAM. One egg may be slimmer then the other for variation.
3. Follow step 1 to cover and add scales to both of the eggs, although press some of the clay sheet towards the smaller egg end and form lips. Create the line in the lips with a toothpick as a tool. For the tails, shape Delight clay as shown, one like a half moon, and the other like a triangle with a "v" shaped notch cut out. Secure tails as in step one. Add lines to the "V" shaped fish tail with toothpick. Cut the dowel into three pieces, one 8" long, one 6" and one 5" long. Press a dowel into the bottom of a fish about 1" in, then remove.
4. Cut a 10" x 3" approx curved base as shown. Draw pattern with a marker and cut with a serrated knife (or a STYROFOAM cutter hot wire tool). Using the side edge of a scrap of STYROFOAM, sand the top cut edges and corners of base so they are domed and round slightly. Roll out a large sheet of Delight to 1/8" thick on plastic wrap and cover the surface and side edges of the base. Smooth any bumps with finger.
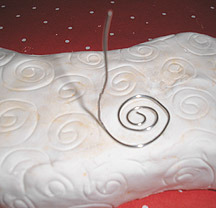
5. Bend one end of wire into a spiral with needle nose pliers. Bend the straight end up to hold tool, and press randomly over base clay to texture. Mark and press the dowels into the base, spaced evenly, with the tallest in the center and allow the Delight to dry overnight or longer. The clay will have a little give but will feel dry and very lightweight when ready to paint.Refer to the finished project for the remaining steps:
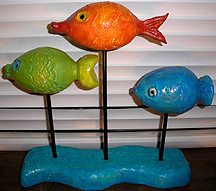
6. Insert dowels into fish. Paint the clay base turquoise, one fish with a 1 part lime + 1 part turquoise mixture, one fish yellow and one fish lime green. When dry, "dry-brush" each with two more colors by dipping the brush into paint, tapping off most of paint onto a paper towel, and brushing it lightly over the surface. Use aqua and periwinkle over the teal fish, orange (2 parts yellow + 1 part red) and red over the yellow fish, and yellow and a mix of 2 parts yellow + 1 part lime over the lime fish, and aqua over the clay base. Let dry.
7. Paint the eyes on the lime fish turquoise and dry-brush with a little off white in the center. Paint the orange fish's eye yellow and dry-brush with a little yellow + lime mix, and the teal fish's eye gray (white with a touch of black mixed) and dry-brush off white. Dip the handle of the large flat brush in black paint and dot on the eye pupils. Paint the dowels black and let dry. Secure dowels in place with tacky glue and let dry. Spray the entire assembled project with sealer and let dry as directed. You may glue a curved shape of felt to the bottom of the base to protect fine furniture if desired.