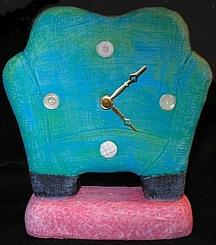
Comfy Chair Clock
by Shirley Rufener, CPD
Shirley's website: www.shirleyrufener.com
Create this great mantel clock using
Creative Paperclay and Styrofoam! Just
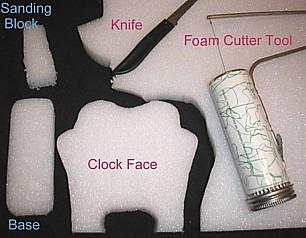
follow the 10 simple steps below.Materials
- Creative Paperclay® (Creative Paperclay Co., Inc.)
- 1" thick sheet of Styrofoam
- Aleene's Fast Grab Tacky Glue (Duncan)
- Black, white, red, lime and turquoise acrylic paint
- Foam cutter tool or kitchen paring knife
- Large flat and 1/4" wide flat paint brushes
- Clockworks kit-for 1/2" thick clocks (Walnut Hollow)
- 4 same size-different style white buttons
- 5 round toothpicks
- Felt tip pen
- Standard ink pen (not a clip on style)
- Large rolling pin
- Clear plastic wrap
- Small shallow dish of water
- Paper towels
Instructions
1. Draw a simple chair shape for clock face and a 2"w x 5"L rectangle for base. (Enlarge photo for pattern.)
2. Cut out shapes. Sand front edges of chair and edges on one side of rectangle using a small piece of foam.
3. Press clockworks shaft into BACK side of clock face and trace outline with felt pen. Use the barrel of an ink pen to finish hole.
4. Scoop out a 1/2" layer of foam with the small end of a plastic spoon or similar.5. Press a large ball of Paperclay onto a large sheet of plastic wrap. Fold the wrap over onto the top side of clay and roll clay to an even 1/8" thick with rolling pin.
6. Unfold plastic wrap and smooth any wrinkles on the clay surface.
7. Cover the foam base and the clock face with clay. Repeat rolling clay flat and cover the back side of clock face except for the clockworks opening! Moisten fingers to smooth. Re-open hole with ink pen barrel.8. Apply glue to one half length of 4 toothpicks, and insert two toothpicks into each chair leg. Apply glue to toothpicks and carefully press chair into base, centering it on all sides.
9. Use remaining toothpick as a tool to impress a light cross hatch fabric texture onto chair. Add chair pattern lines and texture the base with the round end of paintbrush. (see finished project photo)
Press buttons into clay at the 12, 3, 6 and 9 positions.10. Allow clay to dry completely. Remove the buttons. Paint the chair dipping your large brush into lime and turquoise each stroke. Paint the base using both white and red. When dry, "dry brush" (wipe most paint off onto paper towel) white over colors to highlight the texture. Glue buttons in place and dry flat. Enjoy your clock!