Folk Art Bird Ornaments
by Shirley Rufener, CPD
Shirley's website: www.shirleyrufener.com
Materials:
- Delight™ air-dry modeling compound
- STYROFOAM™ hen egg - one for each bird
- Acrylic roller tool or smooth drinking glass
- Kitchen plastic wrap or waxed paper
- Acrylic paints: black, white, leaf green, brick red, school bus yellow
- Permapaque fine point paint markers: Black and White (Sakura)
- Gold color 18 gauge vinyl coated Fun Wire™
- White tacky glue
- Flat paintbrushes (1/2" and 1/4" wide)
- Paper towels
- Needle nose (or round nose) pliers
- Brass large screw eye (used as hooks)
- Clear satin sealer spray (for acrylic paint)
- Thin gold elastic cording
Folk Art is back in style, and so are bird designs. You can create these adorable birds to use as holiday ornaments or to keep out all year long. The secret is using STYROFOAM eggs as your base. To make the surface smooth, cover it with Delight air-dry modeling medium. This material sticks to the STYROFOAM automatically, without glue, and its fun to work with, as it is almost mess free on your hands. It is soft and ready to use straight from the package!
Instructions:
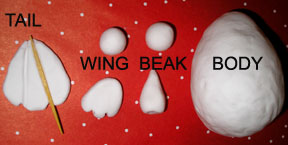
1. Roll out a large sheet of Delight to 1/8" thick on plastic wrap and cover the egg. Smooth any bumps with finger. Roll a medium size flat triangle for the tail and two small flat triangles for the wings. Press a toothpick into a wide side of triangles two times to create indents. Use toothpick to form two lines in the tail and each wing. Now break the toothpick in half, dip one piece into tacky glue and press into the egg, half way, over the beak area. Roll a 1/2" ball into a beak (cone shape) and add to egg over the toothpick armature onto face area with a little tacky glue.
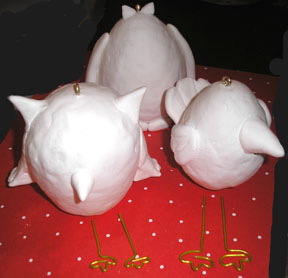
2. Using glue, secure the wings on each side of the egg, about half way up the length (see bird in photo above). Press the tail in place with glue, near the base of the egg, in the back. Add a little glue to the threaded area of a screw eye and press into the top of the head for a loop. Cut two 4 1/2" long pieces of wire and shape into feet at one end. Press straight end of each wire into bottom of body and then remove for now.3. Allow the Delight to dry overnight or longer. The clay will have a little give but will feel dry and very lightweight when ready to paint.
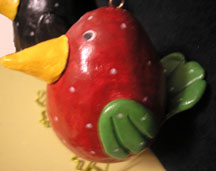
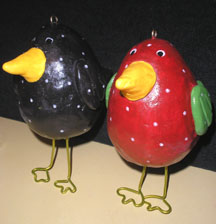
4. Paint the body (egg) only with red acrylic paint ( or paint the body, wings and tail black) and allow the paint to dry. Paint the wings and tail green and let dry. Paint the beak yellow and let dry. Using a marker, paint circle eyes and add random dots to the bird body, wings and tail. Use the black marker to add the eye pupil dots.5. When completely dry, spray the ornament with sealer and let dry as directed. Glue the wire legs in place and let dry. To make a hanging ornament, thread cording through the loop and tie off at the top. Enjoy!